MakeMap can generate a
Google Earth
KML file that displays the photo locations of a
jAlbum photo album.
It can also create a
Google Maps
web page showing these locations.
When you click a waypoint on the map, a thumbnail of the photo taken at that location is shown.
Clicking the thumbnail—or the link below it—opens the corresponding slide page in the album.
If the OpenStreetMap option is enabled, MakeMap generates a waypoints.js file that displays the photo locations on an
OpenStreetMap.
If the Make web‑page option is also enabled, an OSM_Map.html page will be created.
You can download this free program from the software download page on my website.
The current version can generate maps for albums created with the FancyBox skin, PhotoSwipe skin, LightGallery skin, Slide Show 4 skin, Turtle skin (only when the “Make slide pages” option in the jAlbum Pages settings is disabled), PhotoBlogger skin, Projector skin, Story skin, Tiger skin, Plain skin, and Lizard skin. Example albums for these skins can be found here. This note describes the method used to generate maps for the last three skins.
On request, I can extend this program for other skins, but only for skins that generate responsive single‑page albums and support GPS locations. A prerequisite for generating a map is that your photos contain GPS information and that you have enabled the location display on the slide page.
View an example of a generated map using
Google Maps,
or open
this album
and click the second button from the left.
You can also download the
map.kml
file (add “map.kml” to the end of the album URL) for use in Google Earth.
If you open
this album
and click the third button from the left labeled “OpenStreetMap”, an
OpenStreetMap view
will be shown.
In these examples, the “Use image as waypoint markers” option was enabled, but Google Maps initially shows standard blue markers.
To display thumbnails as markers, click the Marker Toggle button in the upper‑right corner of the map.
See
this FancyBox skin album
for an example.
These maps can also display tracks recorded by a GPS device or a smartphone navigation app such as Wikiloc. For Google Maps, tracks are added via Google Earth after converting the GPX tracklog to a KML file using my ConvertTrack program.
For use in an OpenStreetMap page, ConvertTrack can convert a GPX file into a JavaScript file containing track points.
These files are used by the OpenStreetMap page OSM_Map.html.
For MakeMap version 2.9 or later, you must use ConvertTrack version 2.1 or newer, because that version stores the selected track color in the generated JS file.
Track JS files created with older versions should be updated to include the track color.
You can either reconvert the GPX files using the new ConvertTrack version, or manually add the following line at the end of the track JS file:
var polyline = L.polyline(latlngs, { color: 'red' }).addTo(map);
All JS files containing track points must start with the text track.
MakeMap automatically searches for these files when you click the Make Map button, so they can be included in the OpenStreetMap display.
A track file must be saved in the album output directory before clicking the Make Map button.
All kml-files containing track points must also start with the text track,
so that they will automatically be added the the Google map with version 4.1 and later versions.
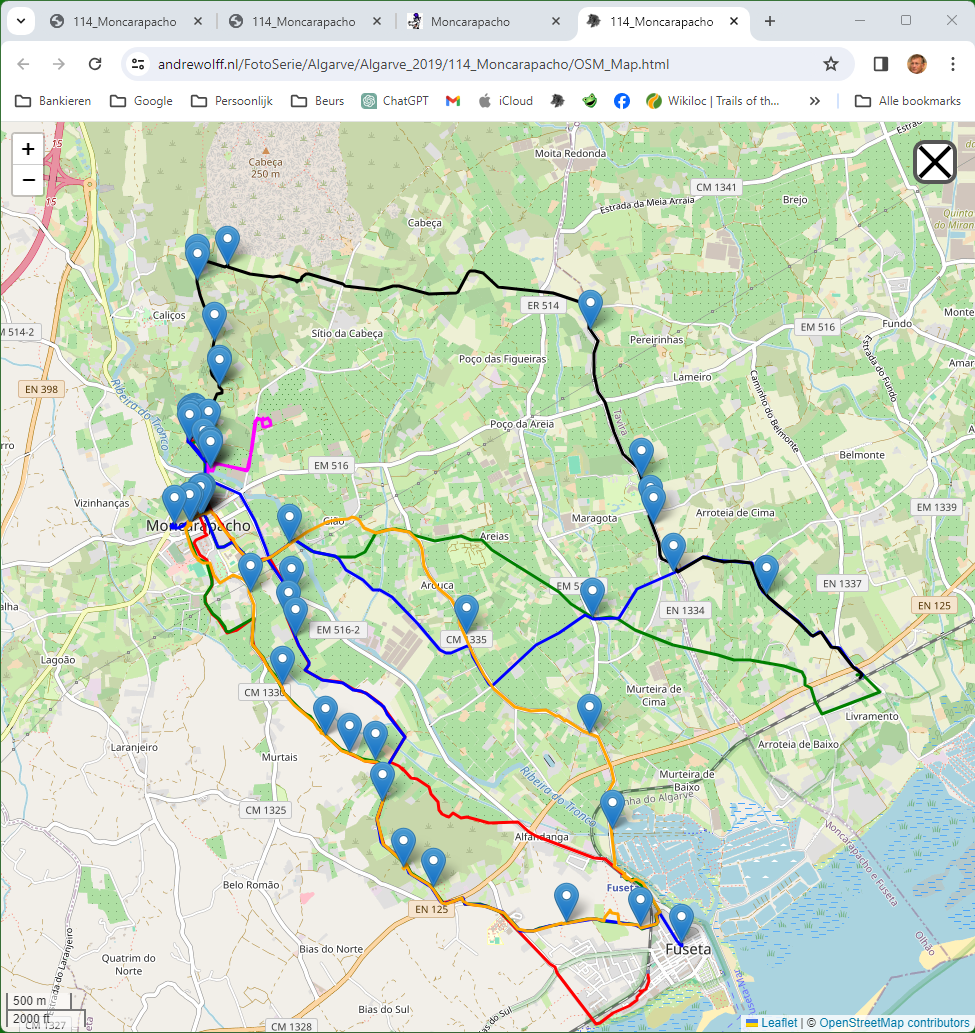
Example of a multi‑track OpenStreetMap:
Click here to open this map.
You should create a link to this map page (as a new page) from the index page, as shown here for the PhotoSwipe skin, or here for the Tiger skin. With the PhotoSwipe, FancyBox, LightGallery, and Slide Show 4 skins, you can enter this link on the Links tab.
Note that after the lightbox has been opened, you can return to the map by clicking the close button when using my skins, the
Slide Show 4 skin,
the FancyBox skin,
the PhotoSwipe skin, and
the LightGallery skin,
because these skins detect that the lightbox was opened from a map.
With other skins, the thumbnails page will be shown instead.
To return to the map when using those skins, you must use the browser’s Back button or Close button.
To create the toolbar with the two buttons in a Tiger skin album, you must enter custom code in two places:
Enter the following code in the Sections / Custom content tab:
<div class="HorNav">

<ul>

<li><a href="Spoor_2014-04-13 142028.gpx" download><img src="res/download.svg"  class="roundbutton" alt="Download GPS track" title="Download GPS track"></a></li>

<li><a href="javascript:OpenOSMMapsRoute()"><img src="res/google-maps.svg" class="roundbutton" alt="Route in OpenStreetMap" title="Route in OpenStreetMap"></a></li>

</ul>

</div>

<script>

    function OpenOSMMapsRoute() { document.location.href="OSM_Map.html"; }

</script>
And enter in the Advanced / Custom code / CSS tab the next css code:
.top-nav a:hover, .top-nav a:active, .HorNav a:hover, .HorNav a:active, #NavHor a:focus {

    color: #ffff00;

    background-color: rgba(114,114,114,1.0);

    text-decoration: none;

    box-shadow: inset 2px 2px 2px 2px rgba(114,114,114,1.0);

}

.HorNav{

    margin-bottom: 0px;

    margin-top: 0px;

    text-align: center;

    line-height: 50px;

}

.HorNav  img {

    vertical-align: middle;

    height: 30px;

    width: 30px;

    padding-bottom: 2px;

}

.HorNav a, .HorNav b, .HorNav a:visited {

    display: block;

    text-align: center;

    text-decoration: none;

    margin-right: 0px;

    margin-left: 0px;

    color: #000000;

    background-color: rgba(204,204,204,1.0);

    padding-right: 10px;

    padding-left: 10px;

    border: 1px solid #000000;

}

.HorNav b {

    color: #ffffff;

    font-weight: bold;

}

.HorNav ul {

 display:inline-block;

 list-style-type: none;

 padding-top: 0px;

 padding-right: 0px;

 padding-bottom: 0px;

 padding-left: 0px;

 margin-top: 0px;

 margin-right: 0px;

 margin-bottom: 0px;

 margin-left: 0px;

}

.HorNav li {

    float: left;

    width: auto;

}

.roundbutton {

  display: inline;

  opacity: 1;

  cursor: pointer;

}

.HorNav  .roundbutton {

    vertical-align: middle;

}

button {

    font-size: 20px;

    cursor:pointer;

    text-decoration:none;

    margin-top: 10px;

    margin-bottom: 10px;

}
Finally, create a res folder inside the image folder and copy the icons
download.svg and google-maps.svg from a FancyBox
res folder into it, or create your own icons.
To see how these buttons are implemented for the Lizard skin, open the Lizard sample album and click the “i” button in the top bar.
See this Plain skin album for a description of the extra buttons used in a Plain skin album.
For a simpler way to open the map, open the album description with the jAlbum HTML editor
and add a link to the OSM_Map.html file, for example:
<a href="OSM_Map.html" target="_blank">Open the OpenStreetMap</a>
This program is based on the same functionality as my EditPhotoInfo program, but in this implementation the GPS information is extracted from the HTML or JS files generated by jAlbum. This means that, starting with jAlbum version 14, it can also be used with original DNG and TIFF files.
The EditPhotoInfo program retrieves GPS information from the original JPEG images in the jAlbum image directory, and it includes additional features such as geotagging photos using a GPS tracklog file and renaming image files.
For more information, see my note How to add a map to a Slide Show 4, FancyBox, or PhotoSwipe album .
After starting MakeMap and generating a map for Google Maps, you will see the following window:
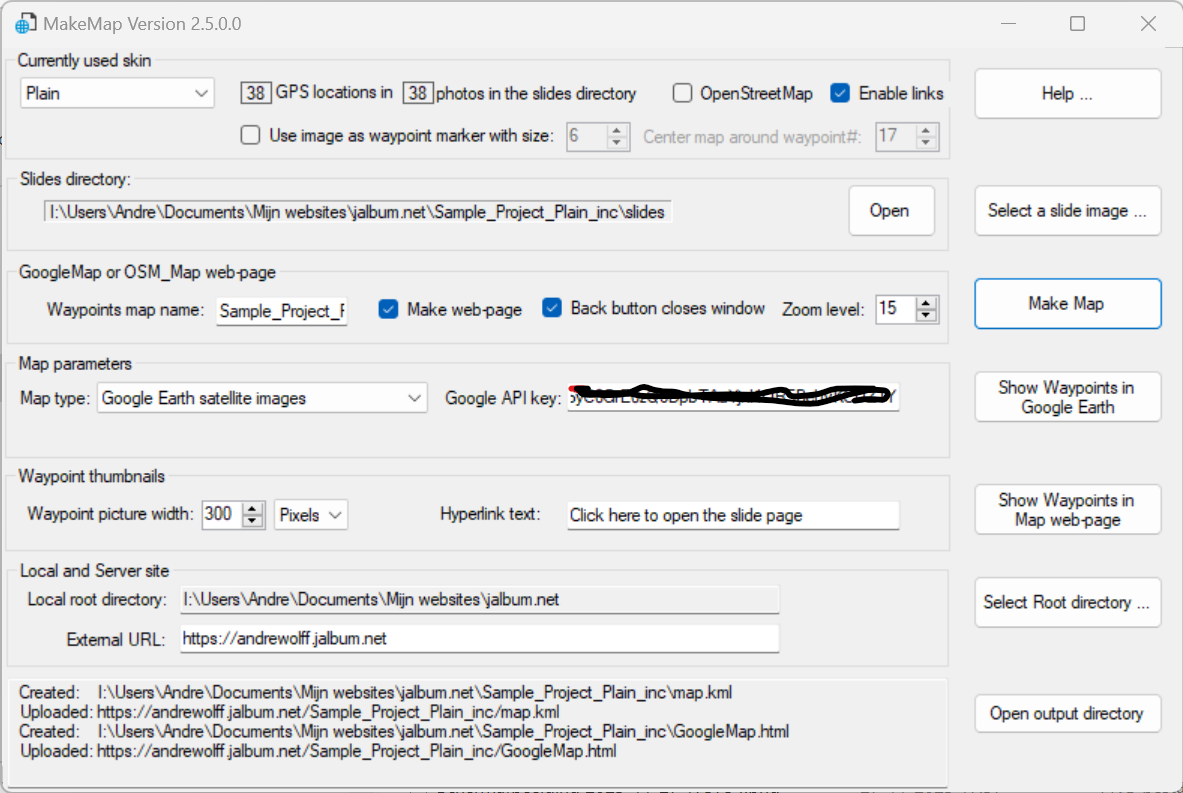
You should first create the album and then generate the map. MakeMap retrieves the required information from the HTML and/or JS files generated by jAlbum.
The screenshot above shows the state of the program after the “Make Map” button has been pressed.
Before you can do this, you must enter the correct information in the “Local and Server site” fields
(Local root directory and External URL) and select the skin you are using in the combo box at the upper left.
If the “OpenStreetMap” option is not selected, you must
obtain a Google API key
and enter it in the corresponding field.
All entered values are saved automatically for future use.
When the “Use image as waypoint marker” option is enabled, small images can be used as markers. This is only possible with JPG and AVIF files, not with WebP files. If this option is enabled, you may see warning messages if image filenames contain characters such as “(” or “)”. You can use my EditPhotoInfo program to correct these filenames.
After starting MakeMap and generating an OpenStreetMap view, you will see the following window:
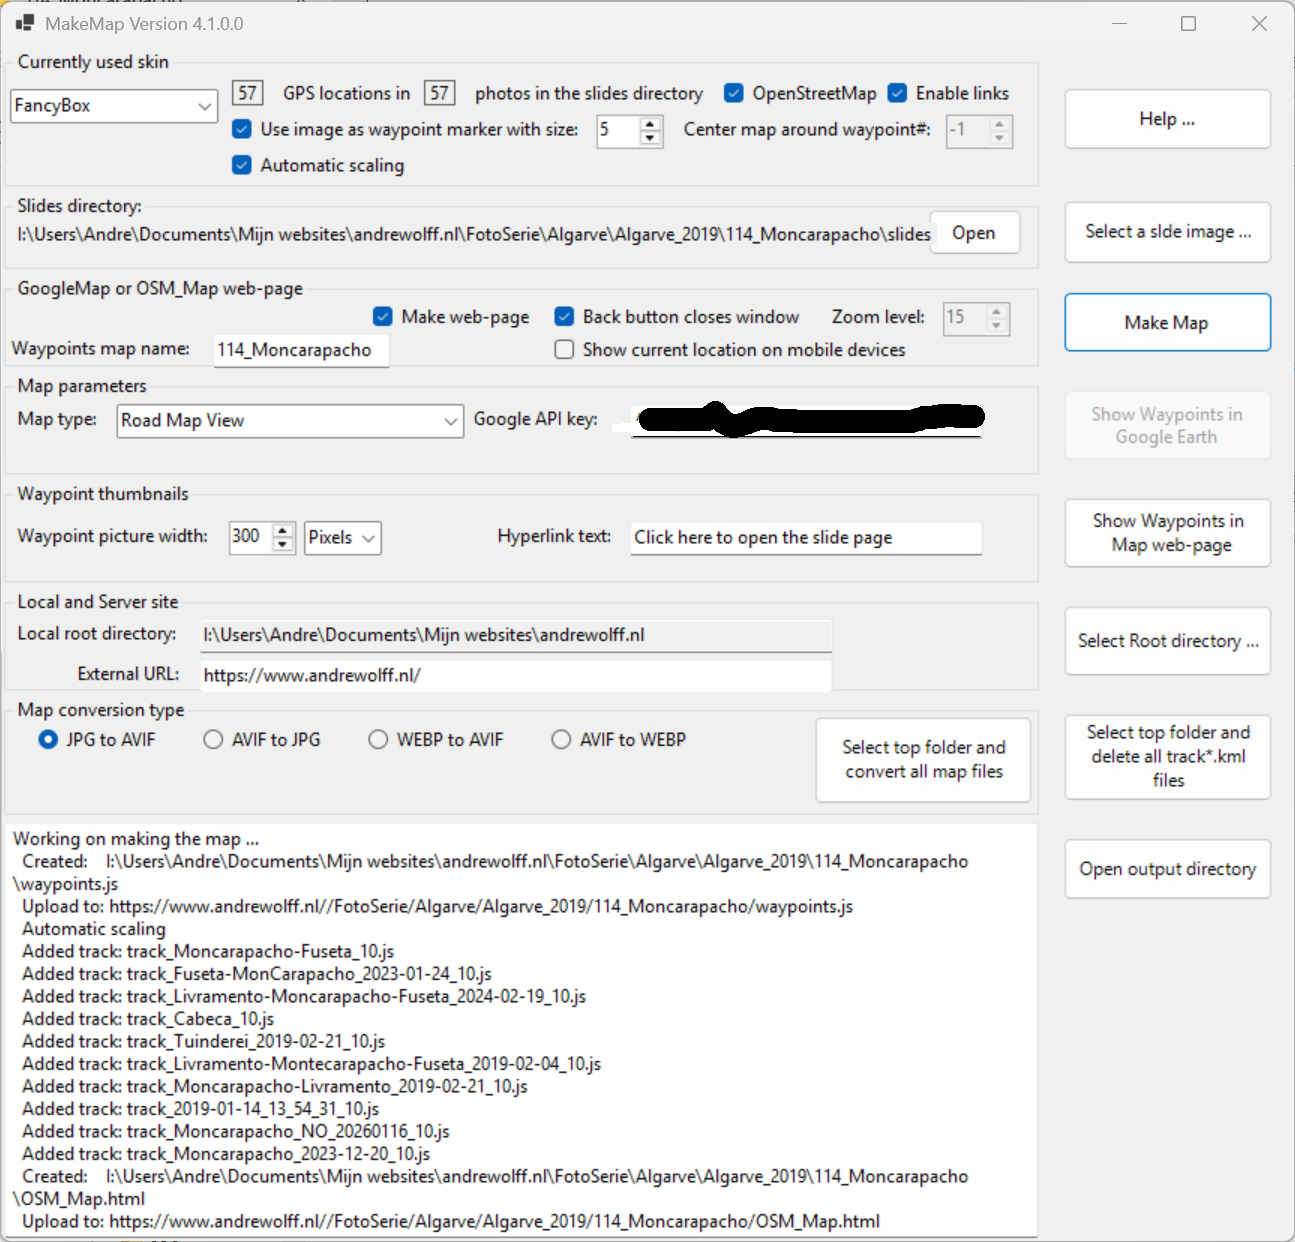
By selecting the “OpenStreetMap” option, you can generate a waypoints.js file to display photo locations on an OpenStreetMap.
In this example, thumbnail images are used as markers with an image size of 6 (range 1–9).
You can also enable “Use image as waypoint marker” for Google Maps, but the map will initially show the standard blue markers.
A toggle button in the upper‑right corner allows you to switch to image markers.
Note that AVIF images cannot be displayed in Google Earth; they will appear as red crosses in Google Earth and as blue markers when uploading the map.kml file.
After selecting “Center map around waypoint #:”, you can choose which waypoint should be centered in the OpenStreetMap view (17 in this example). With zoom level 15, you will see the following:
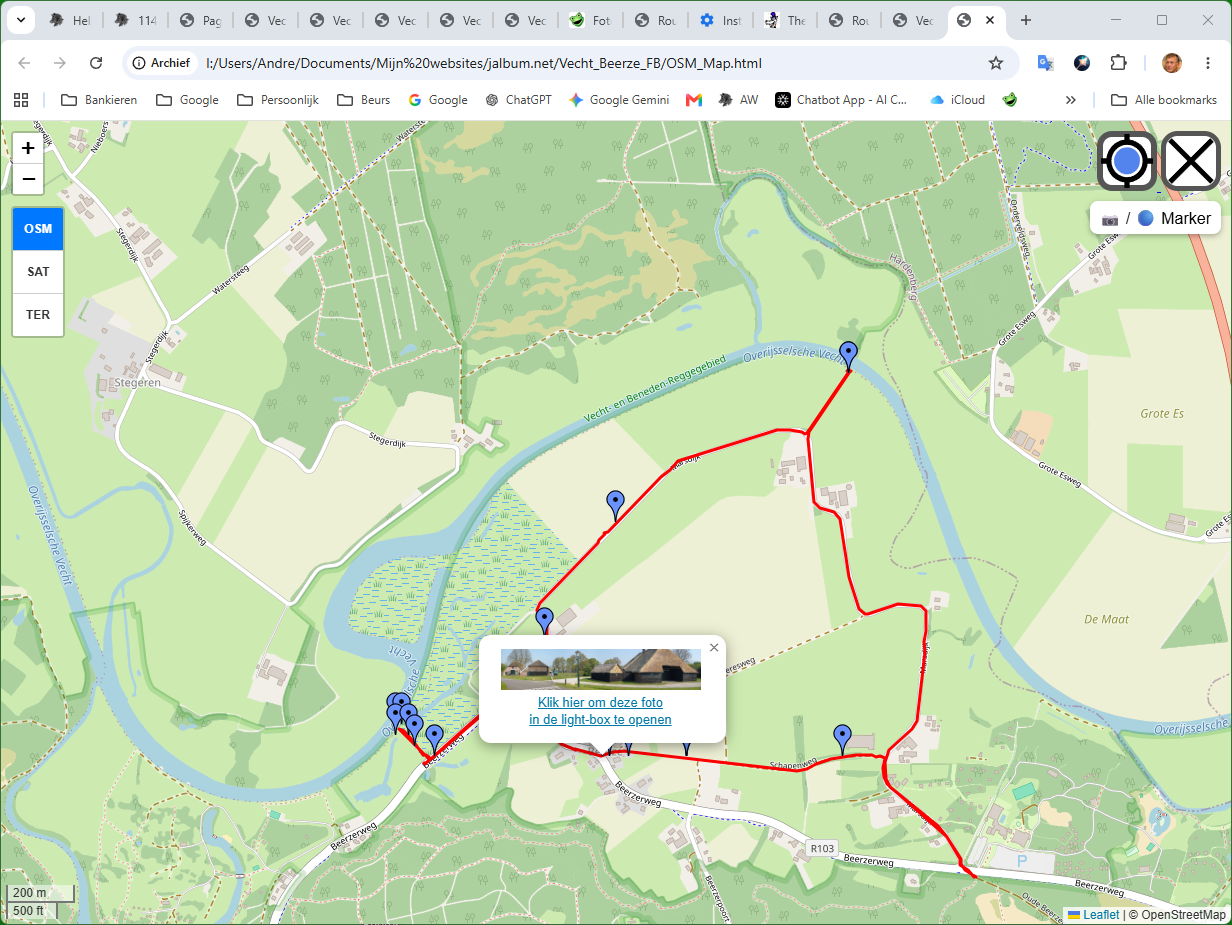
If you select the value -1, the map is centered on the midpoint of all waypoints.
In version 4, an “Automatic scaling” option was added, which has the same effect but also selects a zoom level that ensures all waypoints are visible on the map.
When this option is enabled, you will see:
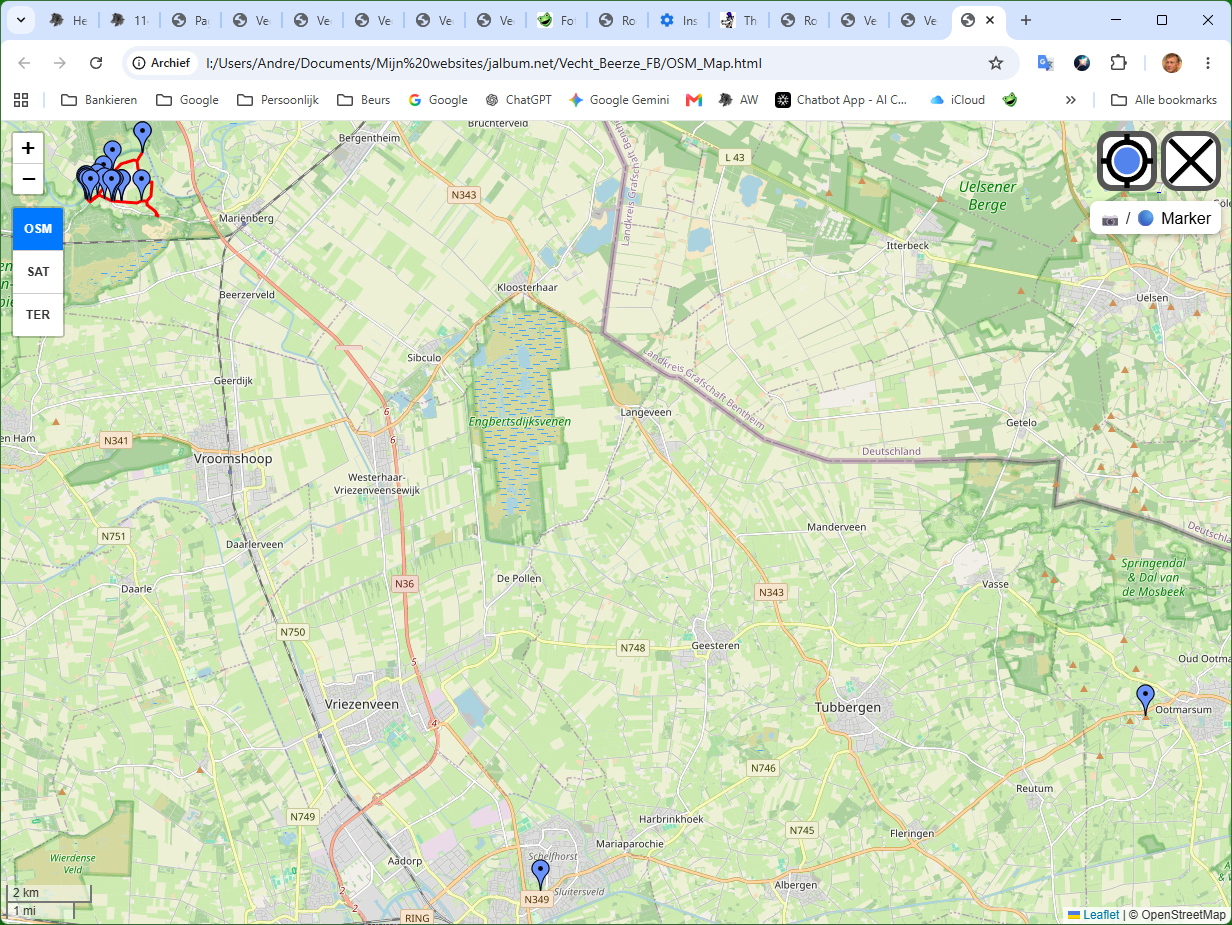
Because two waypoints are far from the area where the walk was made, the Automatic scaling option does not show the walking route in detail. However, in most cases this option works perfectly for displaying a walking or other type of tour. If MakeMap is only used to make a map.kml file without the GoogleMap.html file, the map.kml file will always be displayed with Autmatic scaling with my FancyBox, my PhotoSwipe, my LightGallery and my Slide Show 4 skin.
If you clear the “Enable links” check‑mark, no lightbox with the corresponding slide page will open when clicking a waypoint on the map.
You should disable this option if the skin’s lightbox cannot be opened directly via a URL such as
https://andrewolff.jalbum.net/Sample_Project_PS/index.html?M23,
which opens the lightbox for the 24th image in the album.
It is recommended to disable this option when using the Plain skin, unless you add custom code to enable this.
More information is available on my blog.
The “Show current location on mobile devices” option makes it possible to add your current location to a Google Map or OpenStreetMap using the button with the blue circle, located to the left of the close button in the upper‑right corner. If you are near the displayed track, you can follow the track by clicking the current‑position button. More information can be found here.
The zoom level for an OpenStreetMap can be set using the “Zoom level” spinner control. Choose a value suitable for a PC monitor. This value is automatically reduced by one unit for tablets and by another unit for mobile phones.
The “Map type” combo box allows you to choose the map type that will be shown first in a Google Map. You can select another map type using the buttons in the upper‑left corner of the Google Map page.
If a valid Google API key is entered, the “Map type” combo box is also enabled for an OpenStreetMap.
In that case, Google Earth satellite images can be used in OSM_Map.html.
When enabled, a selection box appears on the left side of the map, allowing you to choose between:
OSM (OpenStreetMap), SAT (Google Earth satellite images), and TER (terrain map).
If the “Hyperlink text” field is empty, no text link will be displayed when clicking a waypoint. To open the lightbox with the corresponding photo, click the small photo in the pop‑up window.
The information in the “Local and Server site” panel is used to create the KML file and the waypoints.js file.
The “Local map” field refers to the folder on your PC that contains the start page of your website (e.g., your home index.html file).
Use the Browse button to select this folder.
The “External URL” is the Internet address of the corresponding folder on your server.
Do not add a slash (/) at the end of the URL.
Compare the contents of the “Local root directory” and “External URL” text boxes with the local (“Created:”) filename and the remote (“Uploaded:”) URL of the generated map.kml file shown in the lower information panel.
Note: Do not use ' or " characters in folder names or URLs.
When all required fields are filled in and no warnings are shown in the lower information panel, select an image in the output slides directory (or the output root directory if you selected “Link to originals”) using the “Select slide image…” button. The program will display the number of detected images and how many of them contain GPS data in the top panel. If images with GPS data are found, the “Make Map” button will be enabled and a map will be generated when you click it.
Therefore, if the “Make Map” button is not enabled after selecting a slide image, this may be caused by:
If a correct map is generated after clicking the “Make Map” button and the “OpenStreetMap” option is cleared,
a Google Earth KML file is created in the jAlbum output directory.
The button “Show Waypoints in Google Earth” will then be enabled, allowing you to view the map using one of the
Google Earth versions, such as
Google Earth Pro, which must be installed on your PC.
There is also a Google Earth App for Android and iOS.
You can also use the Google Earth Web version, which runs in your browser and can therefore be used on mobile devices.
However, this version is not recommended, because it may cause access problems due to CORS restrictions when using images as markers in the KML file.
On most web servers you can prevent this by adding the following line to your .htaccess file in the root folder and uploading it:
Header set Access-Control-Allow-Origin "https://earth.google.com"
This is not possible when using the jAlbum server.
Therefore, we recommend using the Google Earth program on a PC and the Google Earth App on mobile devices to display a downloaded map.kml file.
If the “OpenStreetMap” option is enabled, a waypoints.js file is generated in the jAlbum output directory.
If “Make web‑page” is also enabled, the button “Show Waypoints in Map web‑page” becomes available, allowing you to view the generated map locally on your PC.
You may see blocks containing the text “403r Access blocked”. These will disappear automatically after uploading the files to your web server.
To view this page locally, open jAlbum and preview the album using the Preview local album button, then click the button that opens the map.
Alternatively, open the album output folder in VS Code, open OSM_Map.html, and click the Go Live link in the lower‑right corner.
The “Open output directory” button is also enabled, and the lower information panel shows which files were created and where they must be uploaded.
The “Waypoint thumbnails” panel allows you to configure the properties of the picture shown in a waypoint pop‑up window in a web page or in Google Earth:
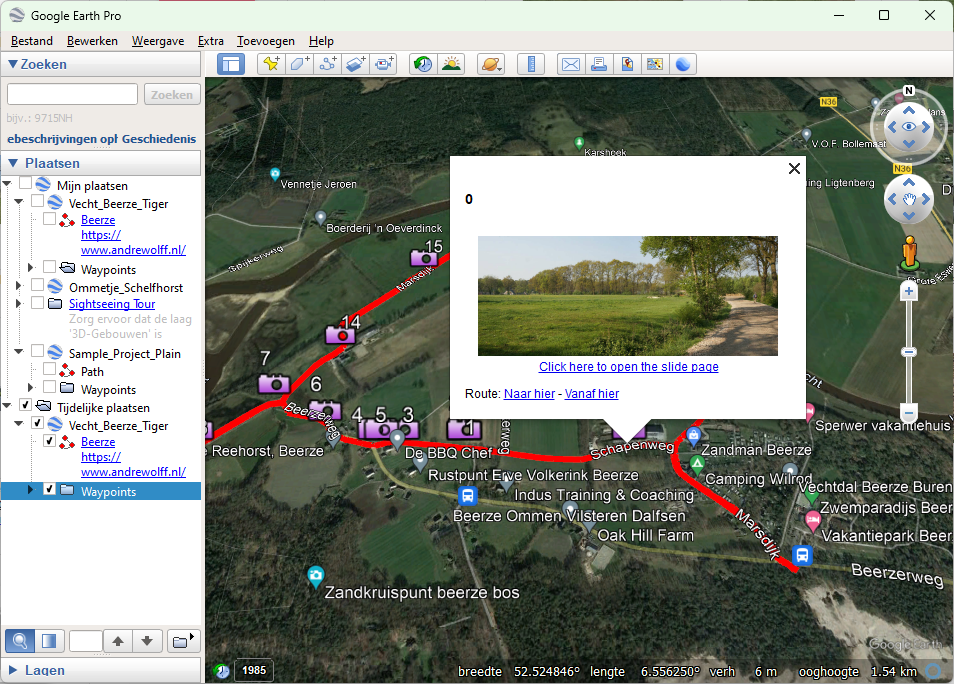
The pop‑up window appears when you click a waypoint icon (a thumbnail icon in this example). The waypoint indicates where the picture was taken.
Note that the generated KML file is shown in the left “Places” panel of Google Earth.
You can add a GPS track KML file there (Path in this example) and save the combined result again as map.kml in the jAlbum output directory.
You can convert a GPX file created by a GPS device into a KML file using
my ConvertTrack program,
but you can also open a GPX file directly in Google Earth and add it as a “GPS Device”.
With verion 4.1 the Google Earth program is no longer required to add tracks to the map.kml waypoints file.
If you convert the tracklog gpx-file to a kml-file in the output directory with a name which starts with the text 'track_',
these tracks will automatically be added to the map.kml file.
If you create a Google Earth KML file with the waypoints, you can also automatically create a GoogleMap.html web page in the output directory
to display the contents of the KML file in your browser, by enabling the “Make web‑page” option.
In that case, after generating the map, the “Show Waypoints in Map web‑page” button will be enabled, allowing you to view the map in your browser using Google Maps:
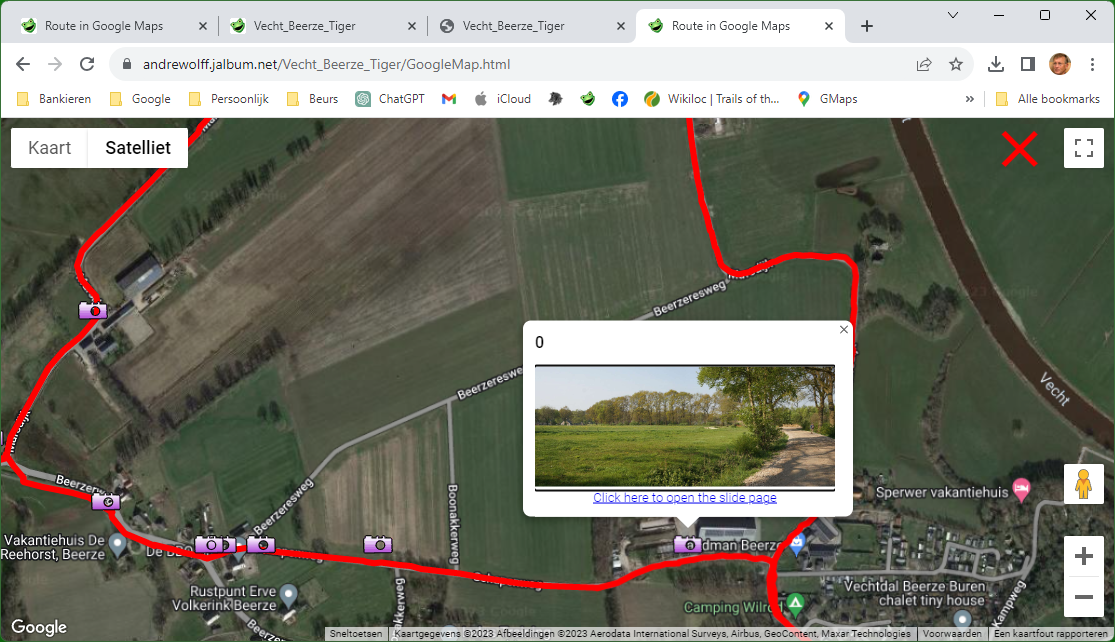
However, this page will only work with an unrestricted Google API key that allows local use. If this is not allowed, you will see an error message. You will only see the waypoints after uploading the KML file to your web server.
This web page contains a close button in the upper‑right corner to return to the photo album. Enable the “Back button closes window” option if the Google Maps page opens in a new window; otherwise, leave it unchecked.
With the “OpenStreetMap” option enabled, you will see:
The final step is to add a link in the generated album to the map.kml file and/or the GoogleMap.html / OSM_Map.html file in the output directory,
and upload these files together with the rest of the album to your server.
For correct use of this tool, the name of the local jAlbum folder must be identical to the name of the folder on the server. The folder structure on the server must match the folder structure on your local PC.
If you follow the (unfortunate) jAlbum recommendation to use an “album” subfolder inside the project folder as the output folder,
you must fill in these fields for every album you create:
Enter the absolute path of the album folder in the “Local root folder” field,
and the corresponding URL of that album in the “External URL” field.
First version of this program, created with Visual Studio 2022.
Problem with spaces in slide image filenames solved.
Help file link corrected.
Fixed an issue when the slide directory contained more images than those generated by jAlbum (old images not deleted).
An error message is now shown if the selected slide was not generated by the currently selected skin.
The two “view map” buttons are now disabled when the “Select slide image…” button is clicked.
It is now also possible to use this program for albums made with the “Link to originals” image linking type.
The Fullscreen button, which was partly visible under the close button, has been removed.
Support added for the Tiger skin.
Two bugs fixed.
Support added for the FancyBox skin.
New “Open output directory” button added to open the folder where the map.kml file is saved.
Warning and status message panel added.
Added WebP support for use with jAlbum version 24.
Adapted for PhotoSwipe skin version 5.
Tiger code improved and images now use an HTTPS prefix.
Support added for the new LightGallery skin.
Updated for code changes in the FancyBox and PhotoSwipe skins. MakeMap now works only with the latest versions of these skins.
New “OpenStreetMap” option added to generate a waypoints.js file for displaying photo locations in an OpenStreetMap.
An OSM_Map.html page is generated when “Make web‑page” is also selected.
The zoom level for an OpenStreetMap can now be set using the new “Zoom level” spinner.
This does not apply to GoogleMap.html pages generated from a map.kml file.
If the “Hyperlink text” field is empty, no text link is shown when clicking a waypoint, and the generated files are shorter. To open the lightbox, click the small photo.
Support added for the Story, PhotoBlogger, and Projector skins.
The Fullscreen button is now visible in the Google Maps web page.
res directory is no longer used.It is now possible to display up to 8 tracks in an OpenStreetMap in different colors (see OSM track names).
The console no longer shows error messages when an OSM map is created and not all possible track names are used.
Selecting -1 after “Center map around waypoint#” now centers the map on the midpoint of all waypoints.
With Plain skin version 3, it is now possible to open the lightbox by clicking the map’s thumbnail image, without using include files.
All track JS files starting with “track” are now automatically displayed in an OpenStreetMap generated by MakeMap.
The track JS files must now contain the track color. ConvertTrack version 2.1 adds the selected color. Older track files must be regenerated.
A problem occurring when an album contained only one slide with GPS data has been fixed.
New “Show current location on mobile devices” option added for OpenStreetMap.
The text on the current‑location button of an OSM map is no longer visible when no current‑location button is selected.
The development console no longer shows the warning: “Google Maps JavaScript API has been loaded directly without loading=async…”.
The current position can now also be displayed in a Google Map.
It is now possible to show the current position on a PC.
The current position is now initially centered in the map.
The map buttons are now smaller on mobile phones.
Problem with PNG files in the Lizard skin solved.
Support for AVIF files added.
AVIF thumbnails can now be used as waypoint markers, but this takes significantly more time than JPG files. Works correctly only in OpenStreetMap; use standard markers in Google Maps.
The new button 'Select top folder and convert all map files' allows you to update all map files when changing image formats (e.g., JPG → AVIF).
The program is now built with the latest version of Visual Studio 2022.
The map type selected in the combo box is now correctly applied in the Google Maps HTML page.
Bug related to Laza’s skins fixed.
The program is now built with Visual Studio 2026 and requires .NET Desktop Runtime 10.0, which will be installed automatically if needed.
The code of the GoogleMap.html page has been redesigned because KmlLayer support in the Maps JavaScript API is being discontinued.
Camera icons have been replaced by standard blue Google Maps markers.
The number of image waypoints is no longer limited to 20.
If “Use image as waypoint marker” is enabled, blue markers are still shown initially in both map pages. A new toggle button in the upper‑right corner allows switching to image markers.
A new “Automatic scaling” option has been added. This works for both Google Maps and OpenStreetMap: when enabled, the map is centered and zoomed so that all waypoints are visible.
If a valid Google API key is entered, Google Earth satellite images can also be used in the OSM_Map.html page.
The Google Earth program is no longer required to add tracks to the map.kml waypoints file. If you convert with my ConvertTrack program the tracklog gpx-file to a kml-file in the output directory with a name which starts with the text 'track_', the track will automatically be added to the map.kml file. After this action, you may delete the kml-file, but I advice you to keep it in the output directory in case you later will re-make the map.kml file. However if you are sure that you will not re-make the Google Map, you can delete the track*.kml files with the new button 'Select top folder and delete all track*.kml files'. Next upload the album again to delete the track*.kml files from the server.
In the info window you see now which tracklog files are äutomatically added to the map ()only for files strating with the text "track"
This version of the program requires Microsoft .NET SDK 10.0 or later to be installed on your PC. This is installed automatically on Windows 10 and Windows 11. The program has only been tested on Windows 10 and 11; older Windows versions are not supported.
To install the program, go to the download page of the author and open the tab labeled MakeMap. Then click “Open the install page”, and once the new page is visible, click the “Install” button. Follow the instructions shown on the screen.
A detailed installation description, including screenshots of all installation windows, is available on my blog.
No license is required for non‑commercial personal use. For commercial use, permission from the author is required.
Issues, suggestions, or comments can be posted on the jAlbum forum.
New versions of the software will, in principle, only be made available on the author’s download page. Information about new releases can also be found on my blog.
This program is written in VB.NET using Visual Studio Community 2026.
Copyright © 2017–2026 André Wolff.